Showing posts with label Cannondale SI Crank. Show all posts

Monday, September 16, 2013

Equipment - End of Season Maintenance

Not to be confused with "Beginning of Season Maintenance", naturally.

The end of each season sees the normal wear and tear on the bike, the stuff that you think, "Well, it should be okay next week". My thought process usually goes a bit more like, "Well, I'll replace that part next week".

In Maine I don't think I mentioned it in the post but right before I left for the last Kingman Loop I switched out the cleats. It's one thing to break a cleat at home, no more than about 20 minutes away from home base, with so little elevation changes that it takes me 40 hours of riding to climb the same amount as 8 hours of "flat" riding in Maine.

It's another thing to break a cleat in a place where I may not have a cell signal, there aren't any bike shops around, and where I may be a couple hours ride away from home base. Even if I had a signal it may be that the calvary, i.e. any potential help, may not have a signal.

Finally there's the off chance that I run into some wolf or something, even get bitten by a couple of dogs.

With these factors in mind I felt it prudent to swap out the cleats. I didn't know when I'd last replaced the cleats but I thought it was in the spring. However, checking back on Strava, it seems that I replaced the cleats last June. Based on my Strava log I have about 200 hours on the cleats. This includes a bit more walking around than normal at some points, especially at Bethel, and a bit less than normal, like my trainer rides. Whatever, 200 hours is pretty good. I'm at 140+ hours for 2013 and I did 75 hours in 2012 on them after June 2012.

I also took the opportunity to twist the left cleat a touch. Usually I like my heel to miss the crank by about 10 mm. For whatever reason I had my heel a bit closer and I found myself twisting my foot outward all the time. This didn't do much for my clipped in confidence as I unclipped somewhat regularly. With short rides and races I kept forgetting about it, but in Maine, with lots of time, I thought about it a lot.

Therefore when I replaced the cleats I adjusted the left one. Of course I then had a really fast ride (for me) immediately after. No knee pain either, and I have really, really fragile knees.

I kick myself when I realize stuff like this.

I mean, I knew it before, but it didn't seem important enough to deal with it. When I finally deal with it I'd think, "Why didn't I do that earlier?"

Along those lines I switched out my cranks. My SRM battery died in July or something and I've been too lazy to fix it. First I needed to find my Cannondale SI crank tools, which I lent the shop when they faced the BB shell. Ends up I buried it in my gear bag so I'd never forget it. Next I needed to stage a new battery (I have it and I know where it is) and solder it in. Finally I wanted to make a decision on crank length.

This year I committed to the 170 cranks. In 2010, my best recent year, I was on 175s, and I was on them since 2004 (minus a break in 2008) after I dropped a friend and returning to racing road rider while on my 175mm crank mountain bike. I then went to do sprints with a 175 mm road crank and went 10 mph faster than my previous 170mm sprint. I wasn't in shape but I figured that some of that 10 mph had to have come from the longer cranks.

I wanted to try 170s again because in my heyday, back in the 80s and 90s, I rode 167.5s and I was literally 6-8 mph faster in my fastest sprints. I thought I could regain that speed by getting shorter cranks.

Unfortunately aging 20 years had something to do with my loss of speed, and 170s actually made me slower than the 175s. In similar circumstances (tailwind sprint on the same course) I was about 3 mph slower on the 170s. Also I haven't even gotten a whiff of those heyday type speeds while on the 170s.

Therefore I gave up on the 170s.

Instead of doing a new battery and stuff I just put the other SRM Cannondale SI cranks on, the ones from the black bike. The battery is good, I have a second head unit so no calibrating, and it has both the 175s and my best-so-far Keos, the Carbons.

BB axle looks fine

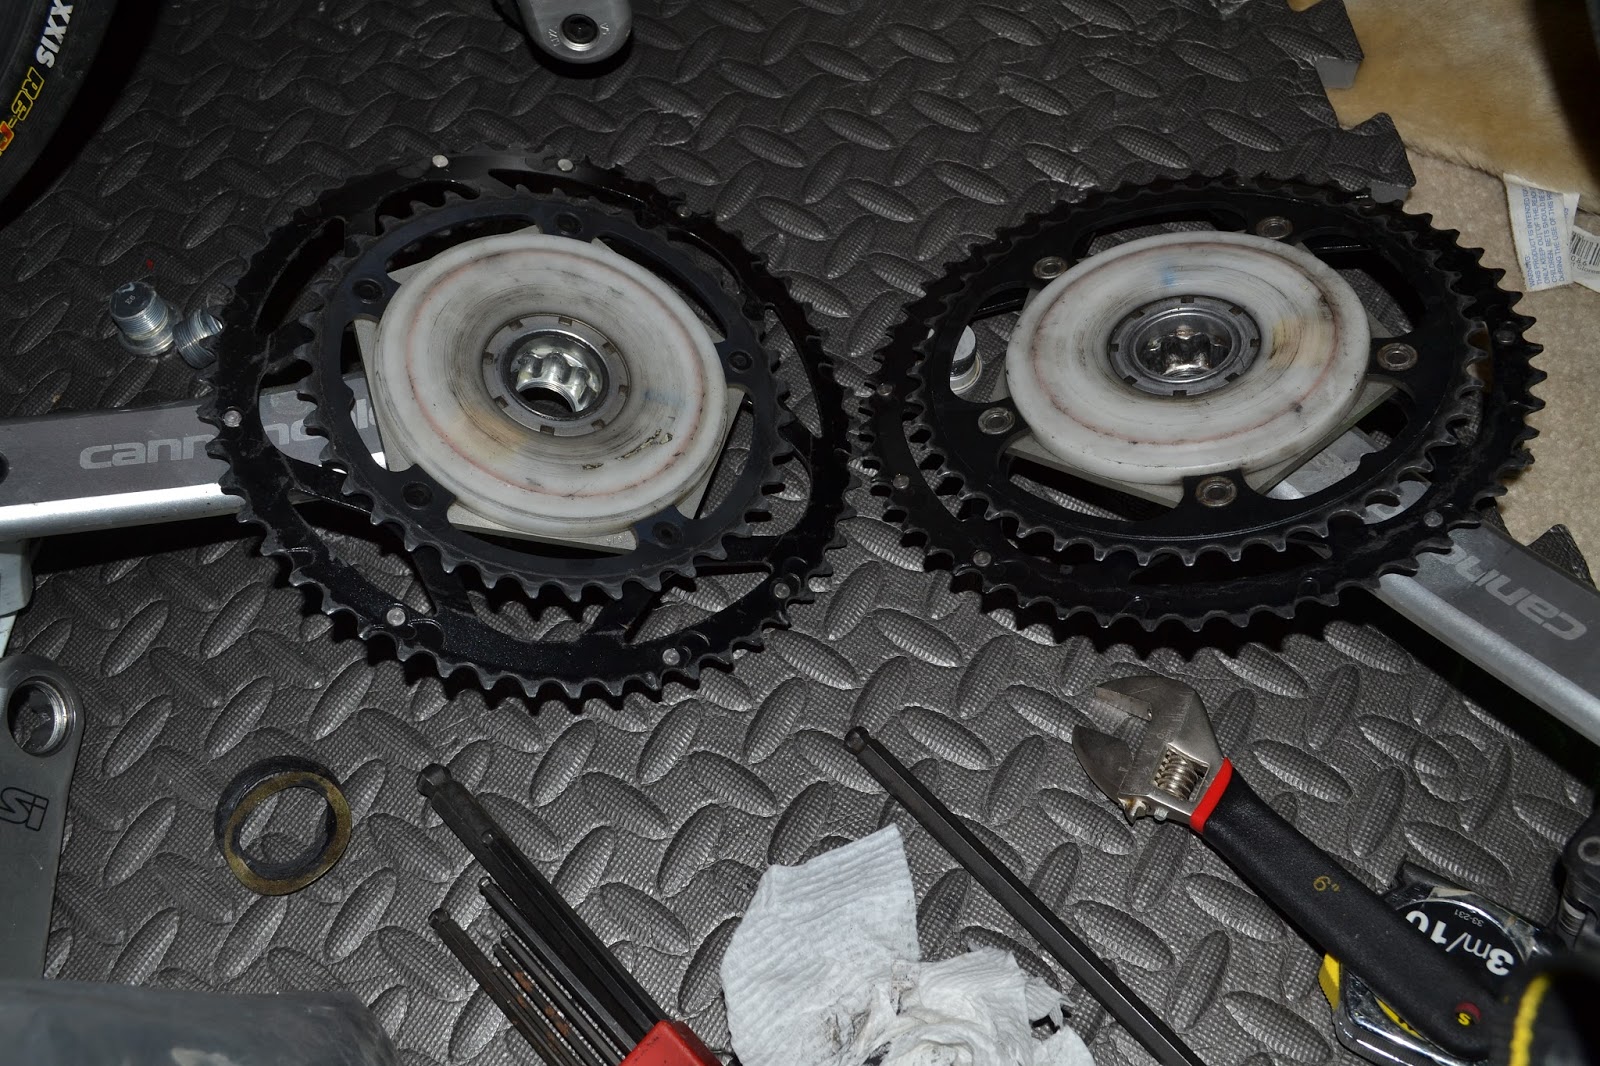
The two right side crank arms.

That's another thing. The Keo Max2 pedals feel really loose, like really loose. The Carbons, allegedly possessing the same retaining force, are much more decisive in their grasp of the cleat. I made the assumption that the Keo Max2s would have the same retaining power due to the same newton-meter rating, but alas the pedals easily give up the cleat.

So my overall changes are as follows:
1. New cleats on my shoes (and they didn't change the retention feel on the Keo Max2s).
2. 175mm crank arms, instead of 170mm. This involves dropping the saddle 5mm to keep the saddle-pedal distance consistent.
3. Second SRM spider with newer/working battery.

I approached my first ride on the 175s with some caution. Longer cranks means a bit more stress on the knees, not because of the higher leverage but because your leg closes more with a longer crank. It opens the same amount, based on the same saddle height, but your knee closes up more. This means more pressure on the knee cap at the top of the pedal stroke.

Well I got on the bike, did some spinning while deliberately not looking at the SRM headunit, and then peeked when things felt okay.

110 rpm.

Whoa.

I expected 90 rpm or lower, after coming from the 170s. Apparently I'm more used to the 175s, even after a season on the 170s.

For 15 minutes I averaged over 100 rpm on the 175s.

No knee twinges, no weird aches, nothing.

I geared up and slowed down my pedaling speed.

One concern with the 175s was that my legs would come up a bit more, a total of 1 cm, based on the fact that my saddle dropped 5mm but the cranks come up 5mm more as well. In my 2012 fitness levels, or even my early 2013 fitness level, I was basically too fat to ride the 175s without gut punching myself with my quads on each pedal stroke.

Now, at the end of 2013, having dropped 12-13 pounds since March, I can pedal the 175s fine.

If I can continue the trend and get down another 10 pounds or so, I'll be back at or close to my 2010 weight. That was a good year, and I hope to at least start 2014 in a similar fashion.

Thursday, April 11, 2013

Equipment - Tsunami 1.1 or "The Now-Red Orange Frame"

For over a year I've been wanting to get this frame back online. It started out as my original Tsunami frame, with the now-standard-for-me geometry - 40 cm seat tube, 56.5 cm effective top tube, 75.5 degree seat tube angle, 73 degree head tube angle, and designed to be used with a 43 mm rake fork.

The original bike, shortly after I built it up in SoCal.

This makes for a long bike to fit my long torso. It's not very tall though, to fit my not-very-tall legs.

The original Tsunami (version 1.0) had industry standard 40.5 cm chainstays and that's where it faltered. Even coasting in fast corners the rear tire would chatter or slide across the pavement. The unusually long front end meant I had too much weight up front, leaving the rear wheel to fend for itself.

This, along with my short-lived upgrade to Cat 2, instigated the second Tsunami, the black one. Geometry-wise I wanted the same bike but with "as short as possible" chainstays. Those ended up measuring 39 cm in length.

The black Tsunami (version 2.0 if you will) also had some aero features. I wanted the narrower tubes with the thought of racing with a CamelBak. This would eliminate the very bulky bottles from the bike, allowing me to take advantage of the aero tubing.

My CamelBak idea faltered because I didn't like the way it worked (can't toss an empty CamelBak, can't empty it all the way, pain to refill, warm in warm weather, harder to breathe, etc). I resorted to using the bottle bosses, literally an afterthought in the build process.

"Might as well put them on although I don't plan on using them."

The black frame worked well although the nut that held the seat down (aka "the rider" aka me) wasn't as good.

I started thinking of combing my favorite elements from both bikes into what would be a Tsunami 3.0 - internal cabling (easier to clean), short chain stay, regular tubing.

On the off chance that Joseph (aka Tsunami Bikes) could alter my orange frame I contacted him. He told me no problem, he could put new chainstays, seatstays, and a brake bridge on for me. I didn't realize it's just trimming one tube; he'd have to rebuild the whole "stays" area.

I decided it was worth sacrificing the internal cabling to save 6/7 of the money a new frame would cost me.

Joseph sent the frame back unpainted (per our agreement) and I had a local car nut paint my frame the same color he was painting his Mini. It happened to come out red so fine, red it was.

I also invested in some frame prep tools, specifically 1 1/8" head tube facer/reamers and a BB30 reamer, ordering them through Expo Wheelmen sponsor Manchester Cycle. These cutting tools, combined with Manchester Cycle's cutting tool handles, would give me a perfectly finished frame. The frames arrived unprepped and the headsets were always a bit tight and the bottom bracket was also. Bob, the owner of the shop, did the work himself, and the red frame (Tsunami 1.1) came back to me ready for assembly. This would save me a few watts turning the cranks - it's bad enough that I can see wattage numbers pop up on the SRM when I'm soft pedaling (i.e. not keeping up with the wheels)

That process dragged on for months while I realized I was missing this piece or that piece. Minor things roadblocked the build, like a front derailleur hanger, or cable housing (I ran out of Nokons), or trying to figure out what stem would work with the FSA Compact bars I wanted to use.

Finally, before the April 7 2013 Criterium de Bethel, my bike was ready to ride. I wrapped the bars at the prior March 24 Bethel CDR Gold Race, rode it on the trainer before April 7, and did my shake down ride during the April 7 Cat 5 clinic.

It seemed to work okay so I put the race wheels on it.

Tsunami 2.0 to the left, 1.1 to the right.

Note the different shaped bars. The Compact FSA bars on the red bike are 3 cm shorter in reach and 2 cm shorter in drop. To accommodate this discrepancy I have a 2 cm longer stem (so 1 cm shorter overall) with about a 0.5 cm drop (so the drops sit about 1.5 cm higher).

For the Cannondale SI cranks I have two sets of arms, 175mm and 170mm. The 170s came with my Cannondale (Team Replica blah blah blah bike). I bought a used SRM setup that had 175s. In the past 10 years I've had much better results with 175mm crank arms, I think due to my lower general power.

170mm and 175mm crankarms on the Cannondale.
Picture taken in SoCal just before I moved the parts to the orange Tsunami.
What's nice is that you can change the crank arm without changing the spider (that holds the chainrings).

However I chose to install the 170 mm crankarms on the red bike. The shorter arms give me an extra 0.5 cm in saddle height. The resulting net height difference is about 1 cm less drop to the drops. More significantly the drops are about 1.5 cm higher relative to the bottom bracket. When I'm sprinting out of the saddle that's the height that matters. We'll see how it goes. If it doesn't work out I'll revert to the old style crit bend bars and I may have to go buy a second set of 175mm crankarms.

A final change, but I'll expand on that more later. I'm using a lower end brake lever, one that doesn't allow multiple shifts into higher gears. It's one click at a time, no more dumping 2-3 gears when I jump. I'll explain this move in a different post.

I accidentally used my last name rather than the Sprinter Della Casa sticker.
I want my name to go on my hubs and helmets. SDC goes on the bike.

Note the smoothed out finish around the seat cluster. It's a combination of gentle filing and an expanding primer. The primer puffs up when applied and then hardens. The guy who painted his Mini showed me the roof - when he started it looked like someone dropped a bucket of golf balls on it from a couple floors up. When he was done with the expanding primer the roof was perfect. I bought into the expanding primer idea.

Deda 14 cm Pista stem.

"Pista" is misleading here. I wanted a 65 degree (-25 degree) 14 cm stem but I couldn't find one. I felt the reach (14 cm) was more important than the height (65 degree) because I was already compromising my reach by going 1 cm shorter. Going 2 cm shorter with a 13 cm stem would be really significant because I tried it already. I figured by using shorter cranks I'd have an extra 0.5 cm in saddle height. Therefore I sacrificed the drop to get the 14 cm stem. The Deda "Pista" stem is only 70 deg so about -20 deg. It barely drops 0.5 cm.

In order to have 100% clamp surface for the stem I left the steerer tube too long and used spacers on top of the stem. This way the whole height of the stem clamps the steerer tube, not all-but-the-top-5-mm.

Close up of tire clearance.

The chainstays are about 39.2 cm. I have to measure them again because I keep forgetting what they measure but they're just a touch longer than the black bike's 39 cm stays. There's plenty of fore/aft clearance. To the sides it's bit tighter.

The head tube area. Note how smooth it is compared to the first picture in this post.

It's a bit smoother than before, primarily due to the expanding primer. I put clear frame protector stickers on by the cable housing. I had to stretch the black Nokon housing by adding extra blue and silver segments. I'd have run out otherwise.

The headset is a super low stack Cook Bros headset. It's a bit of a pain to install but Manchester Cycle did it fine. I installed the orange bike's headset in my basement using unofficial tools. The black frame got its headset installed by a SoCal shop during that year's SoCal training camp. I use the same type of headset on both bikes, just the black one got a steel headset and the red one has a stainless one.

Not exact but you can see the drop/reach.
Wire sticking up is for the SRM, two wires carefully taped up into one.

The bars drop more with the old crit bars and they reach more.
SRM wire is hanging forward and down. I need to rewrap that, it's unraveling.

If you look at the two bars you'll see that even though the FSA Compacts on the red bike are longer on the drops (I wasn't as aggressive when I cut off the excess bar) they obscure more of the front brake. They don't drop down to the tire also.

The black bike, with my standard position, shows how the old crit bend bars drop down more and reach out further. Keep in mind that the black bike as a 12 cm stem, 73 degree (-17 degree). The red bike has a 14 cm stem, 70 degree (-20 degree). Due to the FSA Compact bar geometry I lose both reach and drop even after using a longer and lower stem.

You may have noticed a lot of barrel adjuster showing on the red bike. This is so I don't have to unclamp the brake cable when I switch between the "wide" clinchers and the wide tubulars. The clincher rims are only 23 mm wide but that's the "wide" size. Normal is 19-20 mm.

The tubulars, on the other hand, are close to 28 mm wide. I bottom out the barrel adjuster to clear the tubular rims. It's about 5 turns difference between the two.

I have normal 19 mm wide clincher wheels but they're far too narrow if I want to use the wide tubulars. They've been relegated to the basement.

I have new-to-me wheels but I'll cover those later. Right now they've become my default race wheelset.

I've only ridden the bike a few times now, once in a race, once for a few laps in a Cat 5 clinic, and three times on the road. The biggest thing I noticed is that the bike seems to move more freely. It's due to the reamed/faced bearing surfaces - the bike steers eagerly and the cranks turn easier, even if I'm soft pedaling down a hill. It feels a bit like riding rollers - the bike wants to skate around a bit. It's not a bad thing to have the bike feel more eager to go, that's for sure.

The other thing is that the top tube is a bit lower on this bike. It means I can't put a frame pump under the top tube - the space is too tight for the Park pump I have. It does fit on top of the top tube though and it's where I had it the last time I rode. I may rig up a front-skewer-to-bar thing or a rear-skewer-to-seatpost, depending on how easily I can set one up.

I have a few good scratches on the frame already. The bars turns hard into the downtube when I was building the bike - no tape, no bar plug, a coarse hacksawed bar end. The downtube has a good gouge/nick in it now. And yesterday, when I finished my ride, I sat on the frame pump and it scratched the front of the seat tube above the top tube.

Ah well.

It's now a race bike because I raced on it. And it's a training bike because I trained on it. Such things will happen.