Showing posts with label mods. Show all posts

Friday, July 01, 2016

Equipment - An Old Friend Returns (Brancale Giro helmet)

So an old friend came back into my life the other day. It's a 1983 or so Brancale Giro helmet, the "aero" version of the ubiquitous Brancale helmet out there at the time, the Sport.

I rediscovered the helmet out of the blue, really, because I didn't realize I didn't have it. I mean, okay, I'd looked for it briefly here and there and couldn't find it. I was trying to set up a series of posts on the helmets I used to have. I'd naturally start with my first real racing helmet. Thing was that it was so bizarre and off that I usually kept it separate from the helmets that actually saved me from injury - those are stacked in the bike room, all bashed and cracked. When I couldn't find my first real race helmet I just figured I put it "somewhere else" and figured I'd look again "later". I repeated this a few times while living at the old place and then a few more times after we moved up here about 10 years ago.

Then it appeared in the mail, absolutely and totally unexpectedly.

Wowsers.

So to give you an idea of what I'm talking about, here's some info.

Brancale Giro in stock form, from eBay listings:

Stock front Brancale Giro helmet.

Stock rear Brancale Giro helmet.
I distinctly remember removing the red/green Brancale decals.

The Brancale Sport helmet, which many riders had, from here:

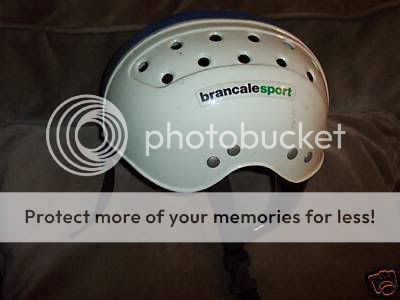
Many of the Sports I saw had a blue sticker over the top.
I remember these as "the white and blue helmets".
Note that these have twice as many metal rivets. I probably thought that it'd be better to have fewer rivets.

The Brancale Giro is about the thinnest, most fragile helmet you could possibly imagine. From what I can tell it's made with ABS plastic and it has some comfort foam pads, like the ones inside normal helmets to pad the styrofoam.

There is zero crush zone in this helmet. If it was a car it'd have a zero star crash test rating.

Case in point. One of my first bike mentors, I think it was Tom (or Ken, but I think it was Tom), he and I did a training ride where we finished by doing a sprint.

It involved hammering down the main road in our town, a pretty big artery road. We'd normally wind it up just before the high school which had a crit-like two-90 degree bend one-way driveway. We'd fly into the first 90 degree turn off the main road, accelerated down the short, 2 lane, one way 100 meter straight there, blasted into another 90 degree turn, then sprinted along the three lane, one-way, 120 meters to a crosswalk over the driveway. It was a perfect way to practice a two corner crit finish while at the limit and in a somewhat controlled environment.

The problem was that on that day we came around the second corner and had to slam on the brakes. A wall of school buses blocked the way. Apparently there was some after school activity requiring a dozen or so busses and the parked buses forced us to slow to a walking pace.

We threaded through the buses and crossed the road at the end of the driveway, rolled into a parking lot, climbed off our bikes, and sat on a wood fence lining the lot. Tom (or Ken) theatrically hit his helmet on one of the wood fence posts, a light hit, expressing his frustration at this whole miles long effort to get to the "final two turns" only to be thwarted by the unexpected busses.

Crack.

We both jumped, startled.

His helmet tap had cracked the thing straight across.

He looked up, now more glum than mad.

"I guess I need to buy a new helmet."

Or, as the case may have been, just glued it back together, because that would have been okay back then.

1984 Uniroyal Training Series, in Southbury or Middlebury, CT.
I'm wearing the Brancale Giro.
The other guy, Nathaniel Ruhlman (younger brother to Paul Ruhlman) is wearing a Brancale Sport.

When I started racing I had gotten the "aero" Brancale Giro, over the ubiquitous and hockey-helmet looking Sport. Even back then I really enjoyed geeking out over the technical stuff. I dreamed about owning a Miyata-Aero road bike (in 1983!). I wanted ovalized tops on my road bars, available at the time, and only got them a few years ago when I got my FSA Wing Compact bars. I wanted aero wheels in 1984, after Francesco Moser blew away the Hour Record using disk wheels, and my dream was to have the first set of tall profile wheels I'd seen (not Zipps, I can't remember the brand, I want to say Aero-something or something-Comp). 

As far as helmets went it was all about ventilation because in those days ventilation was a significant problem. I thought that it would be beneficial if I had more ventilation in my helmet. I couldn't afford a Dura-Ace AX group or an aero Miyata bike but I could increase ventilation in my helmet - all it would take is a sharp knife and some time.
Therefore I enlarged the vents already there while adding four more vents (two on each side up front).

I remember thinking as I was carving the vents, "Okay, I think that's about it, I don't think I can take more out without weakening the helmet."

Heh.

Now I look at my cut outs and think "Wow, every corner is a stress raiser!"

I was also in some Rising Sun stage of my life and I wanted to put the Rising Sun on my helmet. I didn't realize it wasn't really a good thing, but at the time I didn't know. It's not quite as bad as putting a swastika on your helmet but it's sort of similar.

I asked my mom to write down the Kanji for various words. I don't know the list (I'll have to ask someone that knows Kanji) but I think they were things like Speed, Strength, Victory, Endurance.

Bike race things.

I even used my primitive sewing skills to embroider the strap with my name in Kanji.

Then, for two years or so, I raced the helmet. Its time came to an end when the USCF passed the helmet rule where the helmets actually had to work. I believe that was 1986.

Right side.
My Rising Sun wasn't planned well so this beam had to end abruptly.

You can see the two extra vents, compared to the stock Brancale Giro at the top of the post. You can also see how big the vents got. Big is relative, of course, but compared to the helmet up top the vents are like the "bold" version of the "normal" vent.

Does that make sense?

Front.
Note that the two outermost vents in the front were hand cut.
All the vents were enlarged.
My name in the front, as the "head badge" if you will.

I cut the center vents pretty deeply. I debated cutting vents across the middle but I was doing all the cutting with an X-acto knife and it was very slow going opening a new vent. Therefore I nixed the idea of adding two more vents in the center.

The "good side".

The left side was where I hand painted the Sun part of the Rising Sun. It's what I'd consider to be the good side. Again, note the vents.

I vaguely recall enlarging the vents on one side only, riding outside, and "comparing" the difference in ventilation from left to right.

I'm sure there was a substantial difference.

Right.

The Back.
All vents were enlarged.

In the back I knew I needed to let the air out. Therefore I enlarged the vents a bit. However, after all the agony of adding vents to the sides, I decided to leave the vent count alone.

"Kamikaze" is not really an appropriate thing to put on the helmet. I wouldn't do it again.

Close up.

I'll update when I know what the Kanji means.

The rear.

You can see my attempts at neatening up the red beams. The helmet faded, exposing the white touch up paint. It was all hand painted. Since I built a lot of plastic models, generally in the 1/72 scale range (so a tank was a couple inches long, a big plane might be 10 inches long), I only had small paint brushes. It wasn't an ideal way to paint a helmet.

My name in Kanji

I wonder if anyone does this. I forgot I did this until I saw it. Makes me want to do it again.

The inside.
In this picture the right two vents I carved out, and all of them got enlarged.

You can see the rough cuts, my attempts at making the cuts the same angle, etc.

The foam padding is all the padding in the helmet. Soft foam, not structural.

Rear vents. Again, enlarged.

The rear vents were shaped to the outside, not inside, so they didn't look as big from the  inside. I remember convincing myself that the larger vents made a difference.

Carving the vents was sort of a cathartic thing. I'd sit at home and carve out the vents a bit more before some of the big races because "another millimeter of ventilation would help". Or, probably more accurately, another hour of me sitting quietly and carving my helmet would calm me down a bit and help me focus.

The other evening, when I pulled out the helmet, the Missus asked me to put it on. She cracked up when I did, so I had to run to the bathroom to see what I looked like. It was a bit ridiculous because it fits so closely to my head. Aero, though, I have to admit.

I went back and joked to the Missus that I should put it on and roll up to the start line of a race, just to get a reaction from people.

Then I realized I'd be fined for not wearing an approved helmet while riding a bike.

Ah well. I think it'll go into my glass door bookshelf, where I have my various bike trophies on display. I'm not one that has a lot of trophies so luckily (?) I still have room.

I'm glad circumstances allowed me to reunite with my first real racing helmet. It was obviously very personalized, I'd put a lot of sweat equity into it, and really, when I saw it again, it felt like I'd reconnected with an old friend.

Monday, November 11, 2013

Equipment - Modded CycleOps Fluid Trainer, Step 1

Along the theme of "stuff I want to get done this winter" is this idea of modding a CycleOps Fluid Trainer.

One of the biggest shortcomings of a normal trainer is that it doesn't rock side to side. Way back when there was a mild attempt to make such a trainer, manufactured and sold by Technogym. A friend had one and I tried it briefly. To use it you took the front wheel off and clamped the fork into a spring-mounted "fork mount". Two springs, about the size of a coil spring you might find inside an old suspension fork, allowed the "fork mount" tilt from side to side.

I don't remember much of the device except that the springs forced the bike back to vertical with too much power - I felt like I was on a coil spring playground ride rather than on a bike on a pretend road.

Kurt Kinetics has a better design. Theirs rocks from side to side at a natural height, about halfway between the hub and bottom of the tire. Ideally I think a bike would rock around about the bottom bracket - if you watch a rider coming directly at you while rocking the bike you'll see the bottom bracket follows essentially a straight line, the tires carving small arcs under it, the rest of the bike waggling above the bottom bracket.

Having said that I decided that modding my CycleOps to resemble a Kurt would make sense. I'm sure they tried putting the pivot a bit higher and found whatever they found and therefore decided to put the pivot a touch lower.

Having tried one as well as watching numerous other try one, I think they got it right.

In addition the CycleOps and Kurt basically share the same "frame", meaning the trainer frame. There's a connection between the two companies that, although I don't know the details, results in the fact that both companies use what I consider to be the best (aka most rigid) trainer frames around.

A final vote in favor of using the CycleOps frame - I have an extra one. Yes, an extra frame. I had a Fluid trainer and a Power trainer, both by CycleOps. The power trainer, which used a proprietary head unit matched with some electric motor/generator resistance unit, literally started smoking one night, the smell of burning electrical stuff filling the room. CycleOps, to their credit, sent out a Fluid unit as a replacement. Although I asked for just the resistance unit they sent a whole trainer, including the frame. This left me with an extra frame with no resistance unit.

In the meantime I'd switched resistance units to the former-power frame (and for the life of me I don't remember why I thought this was a good thing). This left me with a gray Fluid frame for modding purposes.

A scrap piece of metal gave me the raw materials needed to mod the frame. The thick metal plate would have felt at home as a side skirt on a WW2 tank. It weighed a good 60 or 70 pounds and it was only about 15"x15". Let's put it this way - I had a hard time carrying it on my own.

I recruited the same guy that painted my red frame. He can do some very basic welding and in fact I'd been thinking about having him fix some of the white van's rusty areas. He, in turn, recruited a local metal artisan to cut the metal into smaller pieces with a plasma cutter. That artisan, incidentally, covered his whole house in metal, and who made a local bike sculpture. With the raw plates in hand (the rest of the plate was essentially payment to the artisan) the painter guy could start his work.

First, though, I had to tell him what I wanted from the project. The painter is not a bike guy, and in fact he lights up a cigarette if he doesn't have one already in his mouth. He understands mechanical stuff but really doesn't understand the bike riding part of bike riding.

I tried to get some angles and fit type things in place. I planned on using a 2x6 as a wide base for the trainer, with wooden extensions reaching forward. The regular folding legs won't work because they'd lock the trainer and prevent it from rocking. I know that if I had a 2x4 under the front wheel it's about the right height off the floor, so I figured that if I "fitted" everything with the bike flat on the floor then I could raise/lower it in "2x4" increments.

Thoughts on height, plate angle.
Regular folding legs are the lower tubes, with the black caps on them. They'll go away.

You'll see that the bike's rear tire is sitting on the floor. I don't have the rest of the bike in the frame, just the rear wheel. I wanted to get an idea of where the trainer would sit, what angle the arms would hit, what sort of angle I needed on my "rocking plates".

Gusset shape, if needed.

I had no idea how strong the welds would be so I figured we'd need a gusset plate. I knew that I had given the painter an extremely heavy piece of steel, significantly thicker than the plates used in the Kurt. Plus if the thing broke I'd just topple over, it's not like I'd be going 60 mph in a tuck.

Probable placement of plate.

After a lot of debate I decided that putting the plate under the U-tube would work best. It gave a lot of surface area to the weld area, it would clear the controls of the resistance unit (the spring loaded lever thing), and it gave me enough height off the ground to give me room for the additional plates necessary to create the non-rocking part of the frame.

The guy welding didn't do the gussets immediately and I told him, after checking things out, that they didn't seem necessary. The welder guy did paint everything so it looks semi-pro. He also shaved the original leg mounts, for the folding legs. Although I wasn't keen on that it does clean things up. It also commits me to trying this out.

Bolting things together, the various plates in the right order.
Wood works really well although it looks pretty ghetto.

I didn't get a 2x6 piece of wood but I had 2x4s left over from my garage organizing binge; I decided to use them instead of going out and buying another piece of wood. This seems to be totally fine, very rigid and secure. I used galvanized carriage bolts, galvanized washers, and stainless steel nuts, all in interest of their anticorrosion properties.

(2x4s are 1-1/2" thick so I bought 3-1/2" carriage bolts to give me 1/2" for threads and washers.)

The carriage bolts come up from underneath - I use a gym mat type thing under the trainer so the rounded head underneath won't hurt anything, and on a rug it won't hurt either. This allows me to periodically check the nuts on top without having to tilt the whole trainer on its side.

Now one error the welder made, not realizing how things were going to work, is that he welded the wide plate to the trainer stand. I meant to have the wide plates sandwiching the narrow plate, so there's more room for the rocking motion. He also assembled them in the wrong order, which to me illustrated that he had not fully realized the idea of the whole thing. This is my bad.

My first trial ride ended unsuccessfully inside of two minutes. I used OEM spec rubber spring tower bushings from the now-gone 1993 Honda Civic. It's a light car, 2000 lbs or so, and the bushings are pretty soft. I bought polyurethane bushings for the car but I actually installed them in the car. I thought I had extra bushings and went looking for them. See, back then I bought the shock install kit as well as a "full suspension" kit, but apparently the full suspension kit didn't include shock bushings.

Note the downward tilt (the rest of the trainer is to the left).
Rubber bushings, not polyurethane.

At any rate the rubber bushings allowed too much tilt to the front. This exacerbated something that already happens to the Rock N Roll. The tilt allows the angle to change between the trainer support arm and the bike, forcing something to flex a bit. It appears the skewer moves within the locking arm but the skewer could easily rotate on the frame. The latter would prematurely wear out the dropouts on the frame, not a good thing.

The solution, at least temporarily, is to insert a nylon washer to act as a (bearing) bushing. A better solution would be to use a thrust bearing, typically used in a clutch assembly to allow the clutch to slide back and forth while allowing the shaft to spin. Thrust bearings allow the shaft to rotate (or something to rotate around the shaft) while supporting mainly a side load. Modding the skewer holder to accept two thrust bearings is a bit much right now but at least I have something to think about.

My plans for step two include a couple different things.

First, I need to get much stiffer bushings, probably polyurethane, hopefully a bit taller. A friend who is revamping his car's suspension my have some used poly bushings for me but if they don't work out then I'll just go and buy some poly bushings. I may get larger ones if I buy them, like bushings that fit between a chassis and body (typically in trucks).

Second, I'd like to tackle that pivoting issue with the skewer and skewer holder. There's a great site McMaster Carr and they sell all sorts of hardware. I've bought things like sway bar clamps, stainless steel license plate screws, and even suspension nuts (metric fine thread), and they have an assortment of thrust bearings. I think just having a thrust bearing between the skewer and the skewer holder will work out fine.

For for now that's where I stand. Everything has worked out well so far except for the too-soft bushings. After I fix that I'll see how the trainer actually works when I do out of saddle efforts.